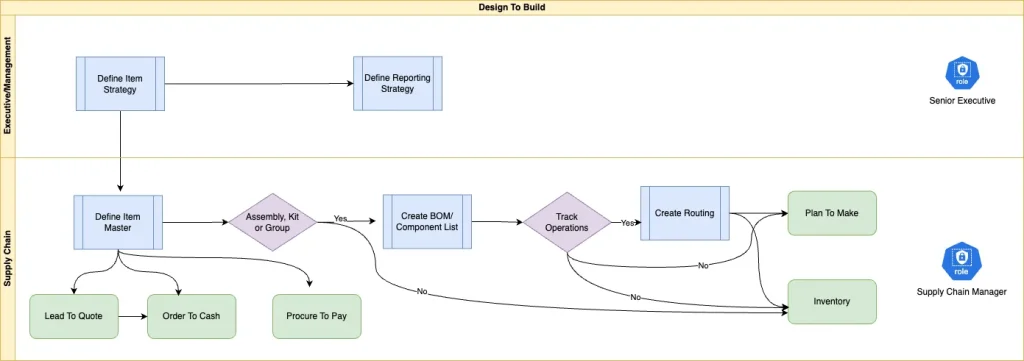
Department leads oversee both inventory and financial management, playing a key role in defining the item strategy. Managing the item master requires collaboration with procurement, engineering, accounting, and sales to assess product requirements. As these needs evolve, items will be added to or removed from the item master accordingly.
1. Enable Essential Features
- Path: Setup > Company > Enable Features
- Ensure that key item features such as Matrix Items and Assembly Items are enabled. Matrix Items allow for easy SKU creation based on item variations like size and color. Assembly Items are essential for manufacturing workflows.
2. Configure Accounting Preferences
- Path: Setup > Accounting > Accounting Preferences > Items/Transactions
- Define default accounts like Cost of Goods Sold (COGS) and Inventory Asset. These accounts automatically populate in item records, streamlining your accounting process.
3. Set Up Costing Methods
Choose from Average, FIFO (First In, First Out), LIFO (Last In, First Out), or Standard costing methods based on your business model. This can be configured under the Cost Accounting section in Accounting Preferences.
4. Create Item Records
- Path: Inventory > Lists > Items > New
- Choose the appropriate item type: Inventory Items, Non-Inventory Items, Services, Assemblies, or Matrix Items.
- Fill in necessary fields such as item name, description, and classification (department, class, location).
5. Utilize Matrix Items for Variants
Use the Matrix Item Assistant to create variants like T-shirts in different sizes and colors. This tool automatically generates SKUs, saving time and ensuring consistency.
6. Order and Transfer Management
- Order Items (Transactions > Inventory > Order Items): Use the Order Items function to manage stock levels based on preferred stock levels and open backorders.
- Transfer Orders: Manage inventory movement between different locations. This involves setting up a transfer order, fulfilling it from the source location, and receiving it at the destination.
7. Inventory Adjustments
Use the Adjust Inventory transaction to make corrections for miscounts or clerical errors. For large-scale adjustments, use the Adjust Inventory Worksheet, but note that this can reset costing methods like LIFO or FIFO to Average.
8. Mass Updates
Use the Mass Update feature for price changes across multiple items. Preview updates before applying them to avoid errors.
Real-World Scenario:
Imagine you’re setting up a new warehouse in your NetSuite environment. Start by enabling inventory features and configuring default accounts. Next, create your primary inventory items and use matrix items for products like apparel. As stock arrives, use inventory adjustments to reflect actual stock levels. For managing inventory between your existing warehouse and the new one, use transfer orders to keep track of goods in transit. Finally, update item prices as needed using the Mass Update feature.